

A useful client portal gives a client one place to request work, follow its progress, and approve the result. Build that loop first. Add billing, chat, and reporting only when you know which part of the loop needs them.
Work from a small service business: one client, one request, one approval. The plan below gives you the records, permissions, and first build prompt to turn that loop into your own portal.
A real starting point · Quarry
Make the next step clear to both sides.
Quarry is a renovation starting point with a visible project board. You can borrow its shared-status pattern for a service portal, then adapt the phases into request, review, and approval stages.
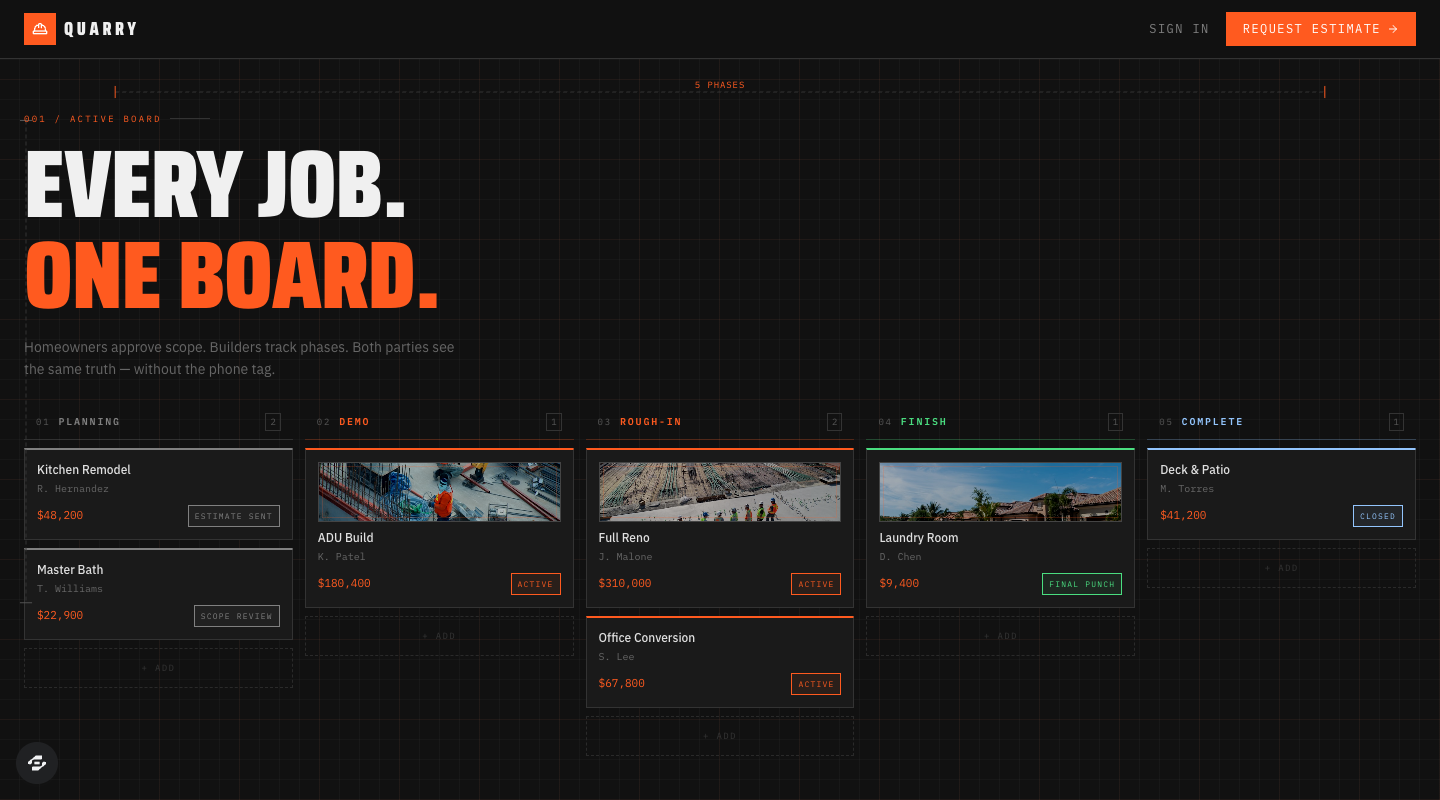
Each column in Quarry’s public preview gives a project a place in the workflow. The projects and amounts shown are illustrative; the board does not establish private client access or completed approval and payment flows.
Preview captured · Open live preview · View full-size imageWhat to inspect
- Keep one source of statusA project’s phase should drive both the client view and the staff board, so their updates stay consistent.
- Decide who can actList who may move a project, request a change, or approve a result. Test those permissions on the server.
- Give clients their own viewThis preview is public. For a private portal, add workspace membership and test which records each client can open.
The board is publicly viewable. The remix page continues through signup or sign-in; check your account access and credits before creating a copy. Current plans and credits.
Define the first client journey
Start with a design studio. A client signs in, opens their workspace, submits a request, receives an update, and approves the final deliverable. The studio sees its assigned requests and changes their status. Both sides can find the current decision without searching through email.
Write down the result you want: “A new client can submit a complete request without assistance, and the studio can identify what needs action next.” Test that outcome before adding more features.
Design the records before the dashboard
If work starts with client-supplied material, try the intake and review loop. It separates conditional requirements, submitted revisions and staff acceptance before the project is ready to begin.
Scroll horizontally to compare all columns.
| Record | Minimum useful fields | Ownership rule |
|---|---|---|
| Workspace | Name, client members, assigned staff | Membership determines access |
| Request | Workspace, title, brief, status, due date | Belongs to exactly one workspace |
| Comment | Request, author, message, time | Inherits the request's access |
| Deliverable | Request, file or link, version, approval state | Inherits the request's access |
Use a short status set: New, In progress, Needs client input, Ready for approval, Approved. Make each transition answer a question. “Needs client input” should explain what is missing. “Ready for approval” should point to a specific deliverable version.
Avoid storing the same status independently in several places. A dashboard summary should reflect the request record, not a second value that can drift. Approval should name the version approved so a later upload does not quietly replace it.
For incoming work, use the service-request triage exercise to define which rule applies first, who owns the next action and how linked duplicates affect the worklist count.
For a monthly service, keep a separate record for each client’s service period. The recurring-deliverables example shows how to preserve unfinished work, an approved skip and a changed deadline without overwriting last month.
Separate authentication from authorization
Authentication answers “Who signed in?” Authorization answers “May this person read or change this record?” A working login does not prove that clients are isolated.
Specify that access is checked on the server for lists, individual records, attachments, search results, and mutations. Hiding an item in the interface is not enough. A person who guesses a URL must not be able to open a different workspace's record.
Start with two roles: client and assigned staff. Give each role only the actions it needs. Keep staff-only notes separate from client-visible comments; a styling convention such as a colored badge is not a privacy boundary.
Build in three reviewable passes
Pass one: requests. Build sign-in, the workspace, the request list, and a new-request form. Use clearly labeled sample content. Confirm that records survive refresh and that required fields produce useful errors.
Pass two: collaboration. Add comments and status changes. Show who made a change and when. Prevent an accidental double-click from creating duplicate submissions. Decide whether clients can edit a brief after work begins.
Pass three: approval. Attach a deliverable version and record the approving person and time. Show the client exactly what they are approving. Add notifications only after the underlying state changes work reliably.
A prompt for the first pass
Create the first version of a design-studio client portal.
A client signs in, sees only their workspace, and creates a request.
Assigned studio staff see requests for the workspaces they support.

Request fields: title, brief, status, due date, workspace, requester.
Start with New / In progress / Needs client input / Ready for approval / Approved.

Check access on the server for every list, record read, and update.
Provide empty, loading, validation, and retry states.
Use sample records that are clearly labeled as examples.
Do not connect payments or send external notifications yet.
Finish with a two-client test plan and any setup still required.
Adapt this prompt with the brief builder. Start by inspecting the published example above, then decide which parts of its workflow you want to keep and which permissions you need to change.
Run the two-client test
Create two test clients in different workspaces and one staff account. Client A creates a request. Client B should not see it in lists, search, a direct URL, or an attachment link that requires authorization. An unassigned staff account should also be denied if that is your access policy.
Then try editing and deleting through the same boundaries. Check that an invalid request fails without partially changing the record. Repeat after signing out and back in. Record the expected and observed result for each test; an attractive demo cannot substitute for these checks.
Invite a small pilot before expanding
Ask a few consenting clients to complete one real but low-risk task. Measure completed requests and successful approvals, not just logins. Observe where they hesitate. If people keep sending the brief by email, improve the request form before adding a reporting dashboard.
Use the launch checklist before inviting more clients. Consult Overskill security information, integration details, and current plans for platform capabilities and requirements. Keep sensitive production information out of your testing until access controls and operational needs have been reviewed.